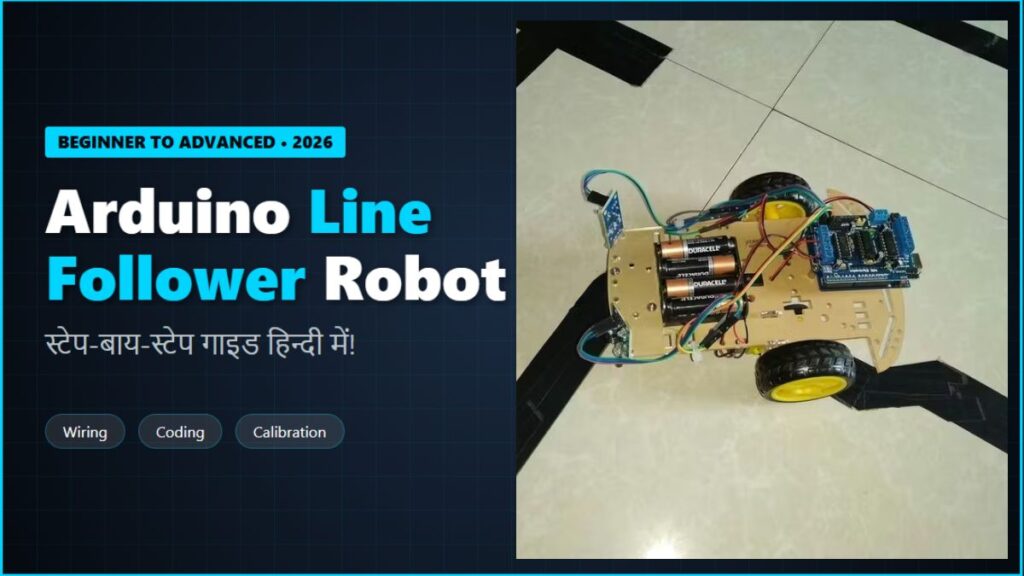
नमस्कार दोस्तों , जैसा कि आप जानते है कि technology के इस दौर मे Robotics कहा पीछे रहने वाली है तो अगर आप भी रोबाटिक्स जानना चाहते है तो मैं Vikas उर्फ Amal Kumar एक Mechanical Engineer आपको Step by Step गाइड करूंगा ताकि कोई प्रॉब्लेम न हो।
अगर आप Robotics और Arduino सीखना शुरू कर रहे हैं, तो Line Follower Robot सबसे लोकप्रिय और आसान projects में से एक है। यह project beginners को sensors, motors और microcontroller programming समझने में मदद करता है।
भाई इस article में हम step-by-step सीखेंगे कि Arduino का उपयोग करके Line Follower Robot कैसे बनाया जाता है, इसका circuit diagram क्या है, code कैसे लिखना है और यह काम कैसे करता है।
Line Follower Robot क्या होता है?
दोस्तों , आपको बता दें कि Line Follower Robot एक ऐसा autonomous robot होता है जो जमीन पर बनी हुई black line या white line को detect करके उसी path पर चलता है।
यह robot आमतौर पर IR sensors (Infrared sensors) का उपयोग करता है। जब sensor को black surface और white surface का difference मिलता है, तो Arduino उसी के अनुसार motors की direction बदल देता है।
इस तरह robot line से हटे बिना track को follow करता रहता है।
Line Follower Robot के फायदे क्या क्या है?
Line follower project robotics beginners के लिए बहुत useful है क्योंकि:
- Arduino programming सीखने में मदद मिलती है
- Sensors का उपयोग समझ में आता है
- Motor driver control करना सीखते हैं
- Robotics competitions में उपयोग होता है
इस project के बाद आप आसानी से advanced robotics projects बना सकते हैं।
Required Components:
भाई अगर आप भी Line follower robot बनाना चाहते है तो आपको नीचे दिए गए components की जरूरत पड़ेगी।
Circuit Diagram:
नीचे basic circuit connection दिया गया है जिससे आप आसानी से robot बना सकते हैं।
| Component | Quantity | Approx Price (₹) |
|---|---|---|
| Arduino UNO | 1 | ₹250 – ₹350 |
| L298N Motor Driver Module | 1 | ₹120 – ₹180 |
| IR Sensor Module | 2 | ₹40 – ₹60 (each) |
| DC Gear Motors | 2 | ₹120 – ₹200 |
| Robot Chassis | 1 | ₹150 – ₹250 |
| Wheels | 2 | ₹60 – ₹100 |
| Castor Wheel | 1 | ₹40 – ₹70 |
| Battery (7–12V) | 1 | ₹120 – ₹200 |
| Jumper Wires | Pack | ₹80 – ₹120 |
Sensor Connections:
- Left IR Sensor → Arduino Pin 2
- Right IR Sensor → Arduino Pin 3
Motor Driver Connections:
- IN1 → Arduino Pin 8
- IN2 → Arduino Pin 9
- IN3 → Arduino Pin 10
- IN4 → Arduino Pin 11
Motor Connections:
- Motor A → Left Motor
- Motor B → Right Motor
Power Connections:
- Battery → Motor Driver Power Input
- Motor Driver 5V → Arduino 5V
- GND → Common Ground
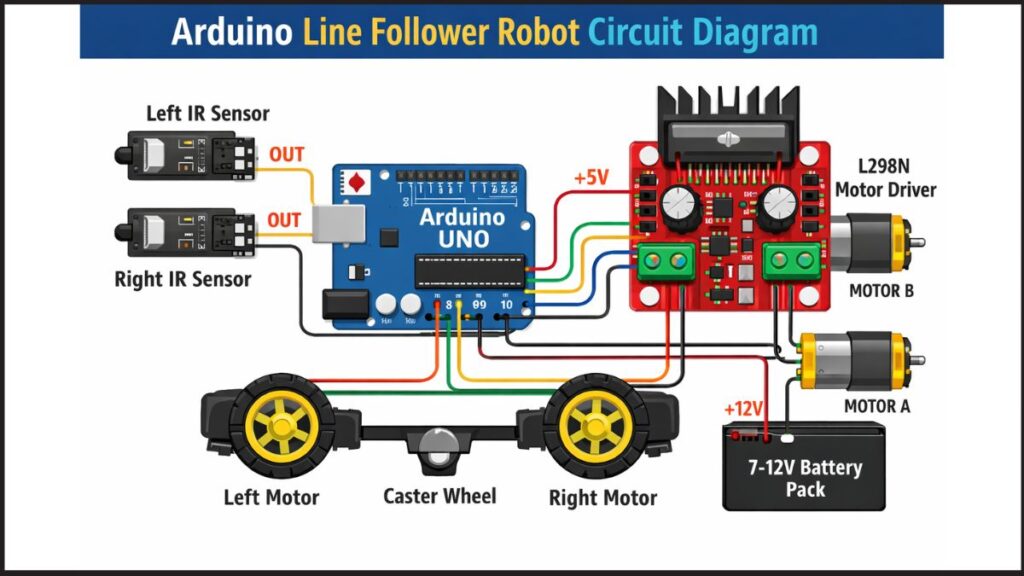
Simplified Circuit Layout:
 IR Sensor (Left) ---- Pin 2
 IR Sensor (Right) --- Pin 3        Arduino UNO
       -------------
        |8 9 10 11|
             |
         L298N Motor Driver
        /                 \
   Left Motor          Right Motor
Arduino Code:
अब Arduino IDE में नीचे दिया गया code upload करें।
#define leftSensor 2
#define rightSensor 3#define IN1 8
#define IN2 9
#define IN3 10
#define IN4 11void setup() {pinMode(leftSensor, INPUT);
pinMode(rightSensor, INPUT);pinMode(IN1, OUTPUT);
pinMode(IN2, OUTPUT);
pinMode(IN3, OUTPUT);
pinMode(IN4, OUTPUT);}void loop() {int left = digitalRead(leftSensor);
int right = digitalRead(rightSensor);if(left == 0 && right == 0)
{
forward();
}else if(left == 1 && right == 0)
{
rightTurn();
}else if(left == 0 && right == 1)
{
leftTurn();
}else
{
stopRobot();
}}void forward()
{
digitalWrite(IN1,HIGH);
digitalWrite(IN2,LOW);
digitalWrite(IN3,HIGH);
digitalWrite(IN4,LOW);
}void leftTurn()
{
digitalWrite(IN1,LOW);
digitalWrite(IN2,LOW);
digitalWrite(IN3,HIGH);
digitalWrite(IN4,LOW);
}void rightTurn()
{
digitalWrite(IN1,HIGH);
digitalWrite(IN2,LOW);
digitalWrite(IN3,LOW);
digitalWrite(IN4,LOW);
}void stopRobot()
{
digitalWrite(IN1,LOW);
digitalWrite(IN2,LOW);
digitalWrite(IN3,LOW);
digitalWrite(IN4,LOW);
}
Line Follower Robot कैसे काम करता है?
इस robot की working तीन मुख्य components पर आधारित होती है:
IR Sensors:
IR sensor surface से reflect होने वाली light detect करता है।
- White surface → light reflect होती है
- Black line → light absorb होती है
इससे Arduino को पता चलता है कि robot line पर है या नहीं।
Arduino Controller:
Arduino sensors से data पढ़ता है और उसी के अनुसार motor driver को command भेजता है।
Motor Driver:
Motor driver DC motors की direction control करता है जिससे robot:
- आगे चलता है
- left turn करता है
- right turn करता है
Robot Assembly Steps कौन कौन से है?
Robot बनाने के लिए नीचे दिए गए steps follow करें।
- Robot chassis पर दोनों motors लगाएं
- Wheels attach करें
- Arduino board fix करें
- Motor driver connect करें
- IR sensors front side में लगाएं
- सभी wires connect करें
- Arduino code upload करें
अब आपका robot line follow करने के लिए तैयार है।
Beginner Tips:
अगर robot सही से काम नहीं कर रहा तो ये tips follow करें:
- Sensor height 5–10 mm रखें
- Black electrical tape का track बनाएं
- Battery voltage stable रखें
- Motors की polarity check करें
Advanced Improvements:
अगर आप इस project को advanced level तक ले जाना चाहते हैं तो ये features add कर सकते हैं:
- PID control algorithm
- Multiple sensors (3–5 IR sensors)
- Speed control using PWM
- Bluetooth control system
- Obstacle detection
Conclusion: Arduino Line Follower Robot Tutorial Hindi
इस tutorial में हमने सीखा कि Arduino Line Follower Robot कैसे बनाया जाता है।
हमने देखा:
- Required components
- Circuit diagram
- Arduino code
- Working principle
अगर आप robotics सीखना शुरू कर रहे हैं तो यह project आपके लिए perfect beginner project है।
Pingback: Smart Home Automation with Arduino – Lights Fan Control Hindi Guide (Beginner Friendly) – robovikas.com
Pingback: Robotics Kya Hai? Beginner Guide Hindi – Zero Se Shuru Karo (2026) – robovikas.com
Pingback: Arduino Robot Projects Hindi – Beginner Se Advanced Ideas – robovikas.com
Pingback: PIR Sensor से Automatic Light System कैसे बनाएं | Arduino Project Hindi 2026 – robovikas.com