लेखक: विकास (अमल कुमार) | Mechanical Engineer
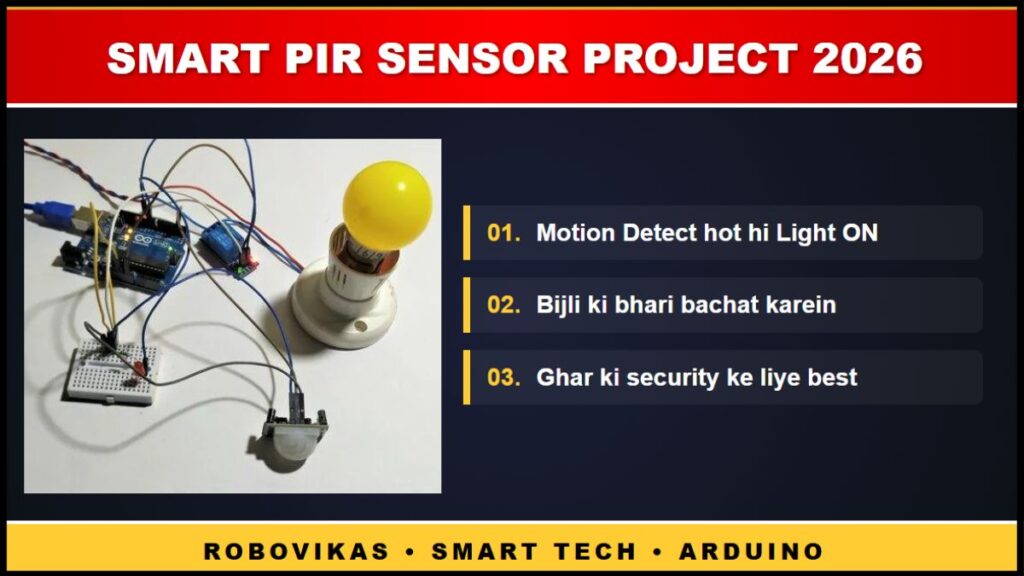
नमस्कार दोस्तों , आपको बता दूँ कि रात के 2 बजे थे। मैं bathroom जाने के लिए उठा, अंधेरे में switch ढूंढता रहा, दीवार से टकराया, और तब जाकर आखिर में light जली। अगले दिन सुबह उठकर सोचा — “यार यह automatically क्यों नहीं जल सकती? जैसे ही कोई आए, light on हो जाए।” बस यही से शुरू हुआ मेरा PIR Sensor Automatic Light System project।
भाई अगर सच बताऊं — यह मेरे सबसे favorite beginner projects में से एक है। सस्ता है, simple है, और घर में actually काम आता है। कोई भी देखे तो impressed हो जाए। तो चलो शुरू करते हैं — एकदम शुरू से।
PIR Sensor क्या होता है?
PIR का मतलब है Passive Infrared Sensor। Simple भाषा में बोलूं तो — यह sensor इंसान या जानवर की body heat को detect करता है।
भाई आपको बता दें कि हमारा शरीर हमेशा थोड़ी infrared radiation छोड़ता रहता है। PIR sensor इसी radiation को पकड़ता है। जैसे ही कोई इंसान sensor के सामने से गुजरता है — sensor को signal मिलता है और वो Arduino को बोलता है “भाई कोई आया है” Arduino फिर light जला देता है।
बस इतना simple है। कोई camera नहीं, कोई image processing नहीं — सिर्फ body heat। इसीलिए यह इतना सस्ता और reliable होता है।
मजेदार बात: Malls, offices और hotels के automatic lights में यही PIR sensor लगा होता है। तुम घर पर वही technology बना रहे हो जो बड़े-बड़े buildings में है।
इस Project से हम क्या सीखेंगे?
यह project beginners के लिए इसलिए perfect है क्योंकि:
- PIR sensor को Arduino से कैसे connect करें
- Digital input कैसे पढ़ें
- LED या bulb को automatically control करें
- Relay module का basic use
- Timer based automation — light कुछ seconds बाद खुद बंद हो जाए
यह सब एक ही project में। और खर्च? ₹400 से भी कम।
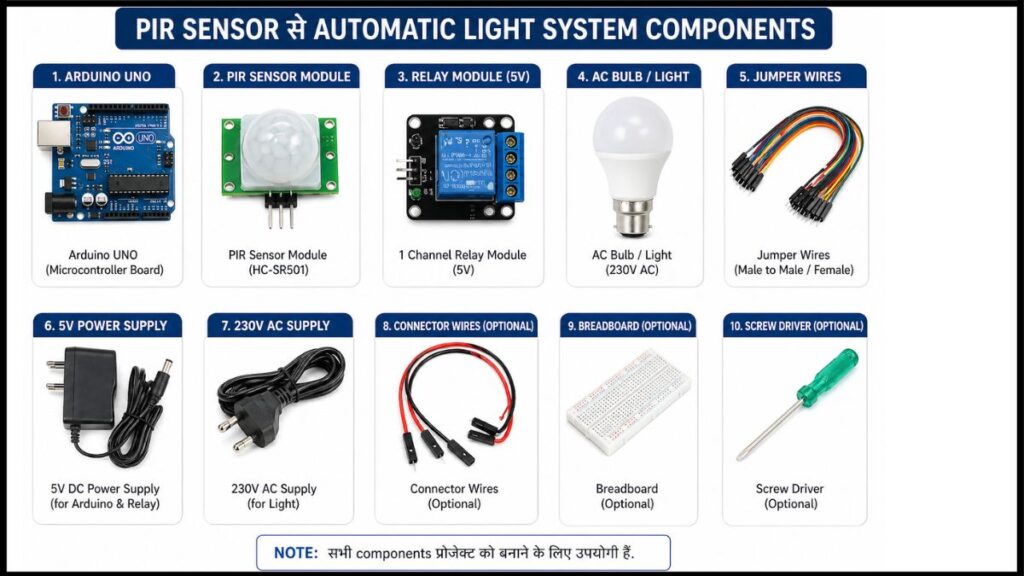
जरूरी Components और कहाँ से खरीदें?
| Component | Approx Price (₹) | Tip |
|---|---|---|
| Arduino Uno R3 | ₹300–400 | Robu.in या Quartzcomponents से लो |
| PIR Sensor Module (HC-SR501) | ₹50–80 | HC-SR501 model सबसे reliable है beginners के लिए |
| LED (5mm) | ₹5–10 | Testing के लिए पहले LED से शुरू करो |
| 220Ω Resistor | ₹2–5 | LED के साथ जरूरी है, वरना LED जल जाएगी |
| Breadboard | ₹50–80 | 400 points वाला काफी है |
| Jumper Wires | ₹20–30 | Male-to-Male और Male-to-Female दोनों |
| 1 Channel Relay (optional) | ₹40–60 | Real bulb control करनी हो तो लो |
कुल खर्च: लगभग ₹400–500
मेरी गलती: मैंने पहले बिना resistor के LED लगाई। 10 minutes में LED जल गई। तुम यह गलती मत करना — हमेशा 220Ω resistor LED के साथ लगाओ।
PIR Sensor को समझो — दो Important Knobs होते है?
HC-SR501 PIR sensor पर दो छोटे-छोटे knobs (potentiometer) होते हैं। बहुत से beginners इन्हें ignore कर देते हैं — यह गलत है।
Knob 1 — Sensitivity (Sx): यह adjust करता है कि sensor कितनी दूर से motion detect करे। Left घुमाओ तो कम range, right घुमाओ तो ज्यादा range। Maximum range लगभग 7 मीटर है।
Knob 2 — Time Delay (Tx): यह adjust करता है कि motion detect होने के बाद sensor कितनी देर तक HIGH signal देता रहे। Minimum 3 seconds, Maximum 5 minutes तक।
मेरी suggestion — Sensitivity पूरी right पर रखो, Time Delay बीच में रखो (लगभग 30 seconds)। बाद में अपनी जरूरत के हिसाब से adjust करना।
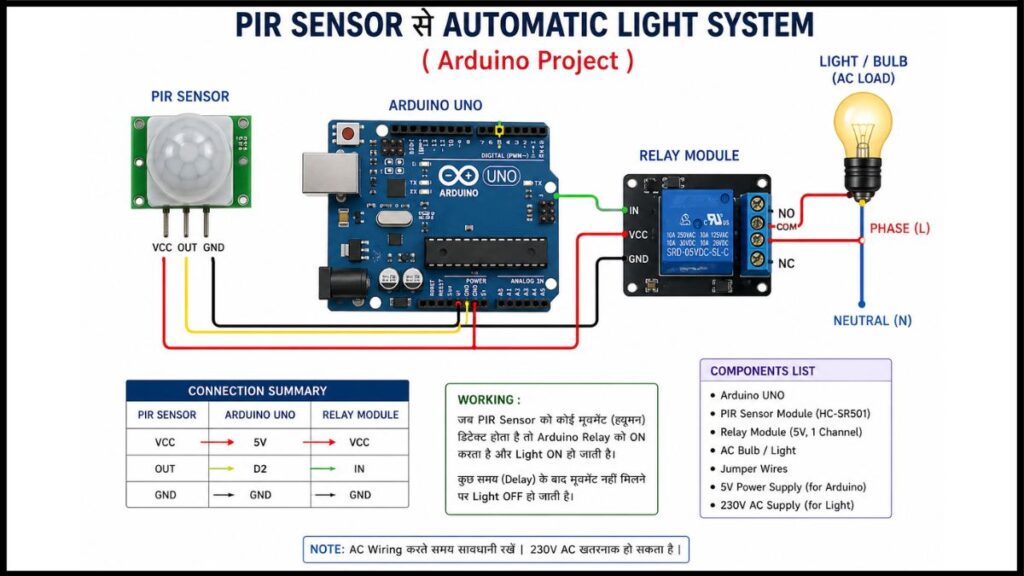
Circuit Connection — Step by Step
PIR Sensor को Arduino से Connect करो:
PIR sensor के तीन pins होते हैं — VCC, OUT, GND।
| PIR Sensor Pin | Arduino Pin |
|---|---|
| VCC | 5V |
| OUT | Pin 2 |
| GND | GND |
ध्यान दो: कुछ PIR sensors में pin order अलग होता है। हमेशा sensor के पीछे या datasheet में check करो। मैंने एक बार उल्टा लगाया था — sensor गर्म हो गया। ? तुरंत निकालो अगर ऐसा हो।
LED को Arduino से Connect करो:
| Component | Arduino Pin |
|---|---|
| LED (+) → 220Ω Resistor → | Pin 13 |
| LED (-) | GND |
बस। इतना ही connection है। Simple है ना?
Arduino Code — Version 1 (Basic)
पहले यह simple version try करो:
// PIR Sensor Automatic Light System - Basic Version
// Author: Vikas (RoboVikas.com)

int pirPin = 2;      // PIR sensor का output pin
int ledPin = 13;     // LED का pin
int pirState = 0;    // Sensor की current state

void setup() {
  pinMode(pirPin, INPUT);    // PIR sensor = input
  pinMode(ledPin, OUTPUT);   // LED = output
  Serial.begin(9600);
  Serial.println("PIR Sensor Ready! कोई हिले तो light जलेगी...");
}

void loop() {
  pirState = digitalRead(pirPin);  // Sensor पढ़ो

  if (pirState == HIGH) {
    // Motion detect हुई!
    digitalWrite(ledPin, HIGH);    // Light जलाओ
    Serial.println("Motion detected! Light ON 💡");
  } else {
    // कोई नहीं है
    digitalWrite(ledPin, LOW);     // Light बुझाओ
    Serial.println("कोई नहीं। Light OFF.");
  }

  delay(100);  // थोड़ा wait करो
}
यह upload करो और Serial Monitor खोलो। सामने से हाथ हिलाओ — light जलनी चाहिए। कुछ seconds बाद खुद बंद हो जाएगी।
Also Read – Arduino Line Follower Robot Tutorial Hindi | Beginner to Advanced Guide 2026
Arduino Code — Version 2 (Timer के साथ)
यह ज्यादा practical version है। Motion detect होते ही light जलेगी और 30 seconds बाद खुद बंद हो जाएगी — भले ही कोई सामने खड़ा हो या न हो।
// PIR Sensor Automatic Light - Timer Version
// Author: Vikas (RoboVikas.com)

int pirPin = 2;
int ledPin = 13;
int pirState = 0;
unsigned long lightOnTime = 0;      // Light कब जली
unsigned long lightDuration = 30000; // 30 seconds (milliseconds में)
bool lightOn = false;

void setup() {
  pinMode(pirPin, INPUT);
  pinMode(ledPin, OUTPUT);
  Serial.begin(9600);
  Serial.println("Timer वाला System Ready!");
}

void loop() {
  pirState = digitalRead(pirPin);

  if (pirState == HIGH && !lightOn) {
    // Motion मिली और light अभी बंद है
    digitalWrite(ledPin, HIGH);
    lightOn = true;
    lightOnTime = millis();          // Time note करो
    Serial.println("Motion! Light ON - 30 seconds के लिए");
  }

  if (lightOn && (millis() - lightOnTime >= lightDuration)) {
    // 30 seconds हो गए — light बंद करो
    digitalWrite(ledPin, LOW);
    lightOn = false;
    Serial.println("30 seconds हो गए। Light OFF।");
  }
}
lightDuration = 30000— यहाँ 30000 milliseconds = 30 seconds है। इसे बदलकर अपनी जरूरत के हिसाब से set कर सकते हो। Bathroom के लिए 60000 (1 minute) अच्छा रहेगा।
Real Bulb कैसे Control करें — Relay के साथ?
LED तो बस testing के लिए है। असली घर की light (220V AC) control करने के लिए Relay Module चाहिए।
जरूरी चेतावनी: 220V AC current बहुत खतरनाक होता है। अगर तुमने पहले कभी electrical wiring नहीं की है तो किसी बड़े की help लो। गलत connection से serious accident हो सकता है।
Relay connection:
| Relay Pin | जहाँ Connect करो |
|---|---|
| VCC | Arduino 5V |
| GND | Arduino GND |
| IN | Arduino Pin 13 |
| COM | Bulb का एक wire |
| NO | Power supply का positive |
Code में कोई बदलाव नहीं करना — सिर्फ LED की जगह Relay लगा दो।
Project Test करो — Step by Step
- सब connections check करो एक बार
- Arduino को laptop से connect करो
- Code upload करो
- Tools → Serial Monitor खोलो (Baud rate: 9600)
- कुछ seconds रुको — sensor को warm up होने में 30-60 seconds लगते हैं
- अब sensor के सामने हाथ हिलाओ
- LED जलनी चाहिए और Serial Monitor में message आना चाहिए
Important: PIR sensor को power देने के बाद 60 seconds तक कुछ मत करो। यह sensor का warm-up time है। इस दौरान sensor randomly trigger हो सकता है — यह normal है। मैं पहली बार यह नहीं जानता था और सोचा sensor खराब है।
Common Problems और Solutions क्या है?
Problem 1: Sensor हर 2-3 seconds में trigger हो रहा है, कोई नहीं है सामने → Sensor warm up हो रहा है। 60 seconds रुको। → या nearby fan/AC की हवा sensor को trigger कर रही है — sensor की direction बदलो।
Problem 2: बहुत कम range है, सिर्फ 1-2 feet पर detect होता है → Sensitivity knob को right side घुमाओ।
Problem 3: Light जलती है लेकिन तुरंत बंद हो जाती है → Time Delay knob को थोड़ा right घुमाओ।
Problem 4: Serial Monitor में कुछ नहीं दिख रहा → Baud rate 9600 set करो।
Problem 5: LED बिल्कुल नहीं जल रही → Resistor connection check करो। LED के + और – सही लगे हैं?
Also read – Smart Home Automation with Arduino – Lights Fan Control Hindi Guide (Beginner Friendly)
इसे और Smart कैसे बनाएं — Upgrades
यह basic version है। आगे बढ़ना हो तो:
- LDR Sensor जोड़ो — रात को ही light जले, दिन में नहीं (बिजली बचेगी)
- LCD Display जोड़ो — कितनी बार motion detect हुई यह count दिखाओ
- Buzzer जोड़ो — Security system बनाओ, motion होने पर alarm बजे
- ESP8266 जोड़ो — Mobile पर notification आए जब कोई आए
- Multiple Sensors — पूरे घर में लगाओ, हर room में automatic light
इनमें से हर upgrade पर अलग tutorial आएगा RoboVikas पर।
आपके लिए मेरी एक सलाह:
भाई यह project मुझे इसलिए पसंद है क्योंकि यह actually useful है। Bathroom में लगाओ, corridor में लगाओ, main door पर लगाओ — हर जगह काम आता है। और जब घर वाले देखते हैं कि light खुद जल-बुझ रही है तो उनके चेहरे का expression देखने लायक होता है।
तुम भी बनाओ। और जरूर नीचे comment करो कि कहाँ लगाया — bathroom में या security के लिए।
अगला Project: Temperature और Humidity Monitor with DHT11 → [जल्द आ रहा है]
विकास (अमल कुमार) Mechanical Engineer | RoboVikas.com
Pingback: DHT11 Sensor से Temperature और Humidity Monitor कैसे बनाएं | Arduino Project Hindi 2026 – robovikas.com