लेखक: विकास उर्फ अमल कुमार | B.Tech Mechanical Engineering, AKTU Lucknow (2021–2025) Published: June 2026 | Reading Time: ~7 min
Table of Contents
- AI Voice Robot क्या होता है?
- क्या क्या चाहिए? (Components List)
- Step 1 — Raspberry Pi Setup
- Step 2 — Hardware Assembly
- Step 3 — Libraries Install
- Step 4 — Robot Code
- Step 5 — Obstacle Avoidance
- Common Problems और Solutions
- आगे Upgrade कैसे करें?
- FAQ — अक्सर पूछे जाने वाले सवाल
नमस्कार दोस्तों, अगर आपको सच बताऊँ? तो जब मैंने पहली बार Ai रोबोट बनाने का सोंचा था तब मेरे दिमाग में वही Hollywood वाला scene याद आया। चमकदार body, नीली आँखें, robotic आवाज़। फिर actually बनाने बैठा तो पता चला, यार, reality थोड़ी अलग होती है। लेकिन जब बन गया — वो feeling? पूरे hostel को जगा दिया उस रात मैंने।
मेरा नाम विकास है, लोग अमल कुमार भी बोलते हैं। AKTU Lucknow से 2025 में Mechanical Engineering की। 3rd year में यही robot बनाया था — और आज वही step-by-step आपको सिखाऊँगा। आसान भाषा में, बिना किसी boring theory के।

AI Voice Robot क्या होता है?
AI Voice Robot एक ऐसा robot होता है जो इंसान की आवाज़ को सुनता है, उसे समझता है, और उसी के हिसाब से काम करता है। Normal robot सिर्फ pre-programmed instructions follow करता है — “जाओ, रुको, वापस आओ।”
AI Voice Robot इससे आगे जाता है:
- आप बोलते हो “आगे जाओ” — robot आगे चलता है
- आप बोलते हो “रुको” — robot रुक जाता है
- आप तुम बोलते हो “Hello” — robot जवाब देता है
- आप कोई सवाल पूछते हो — robot AI की मदद से जवाब देता है
यही हम आज बनाएंगे।
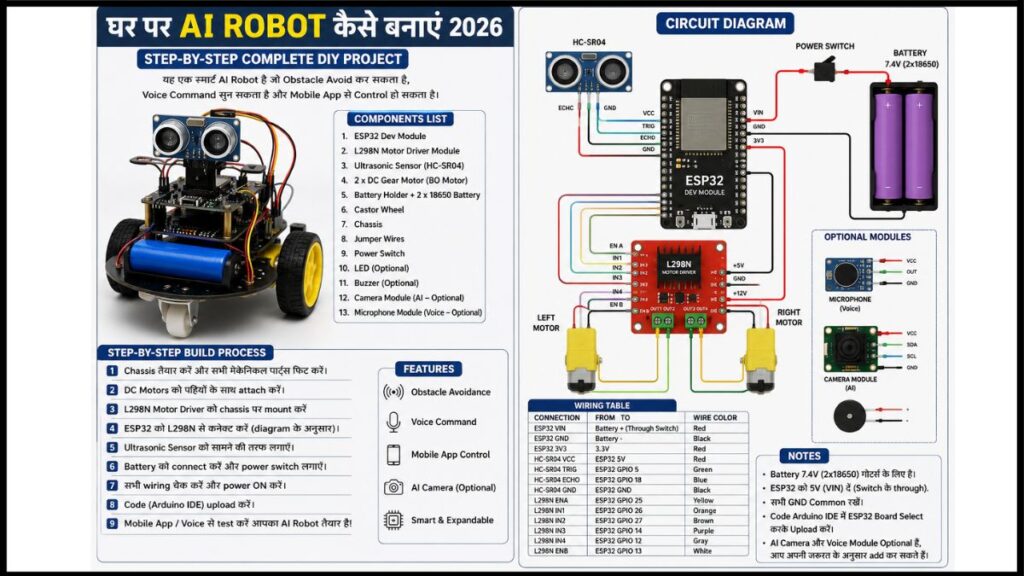
क्या क्या चाहिए? Components List:
| Component | काम | कीमत |
|---|---|---|
| Raspberry Pi 4 (4GB) | Robot का brain | ₹5,000 |
| L298N Motor Driver | Motors को control करना | ₹150 |
| DC Gear Motors × 4 | Robot को चलाना | ₹600 |
| 4WD Robot Chassis | Robot की body | ₹700 |
| USB Microphone | आवाज़ सुनना | ₹400 |
| Small Speaker (3W) | जवाब देना | ₹200 |
| 18650 Battery × 2 + Holder | Power | ₹400 |
| Micro SD Card 32GB | OS रखना | ₹350 |
| Jumper Wires + Breadboard | Connections | ₹180 |
| HC-SR04 Ultrasonic Sensor | दीवार पहचानना | ₹80 |
कुल Budget: ₹8,000 – ₹10,000
Raspberry Pi क्यों? यह एक minicomputer है जिस पर Python चलती है, AI models run होते हैं, और internet connect होता है। Arduino से ज़्यादा capable है AI projects के लिए। Official site: raspberrypi.com
Step 1 — Raspberry Pi Setup करो।
Raspberry Pi पर Raspberry Pi OS install करना पहला काम है।
- raspberrypi.com/software से Raspberry Pi Imager download करो — बिल्कुल free है
- SD card laptop में लगाओ
- Imager में Raspberry Pi OS 64-bit select करो
- SD card select करके “Write” करो
- 5-10 minute में done — SD card Pi में लगाओ, power on करो
Boot होने के बाद terminal खोलो और यह चलाओ:
sudo apt update && sudo apt upgrade -y
हो गया। Pi ready है।
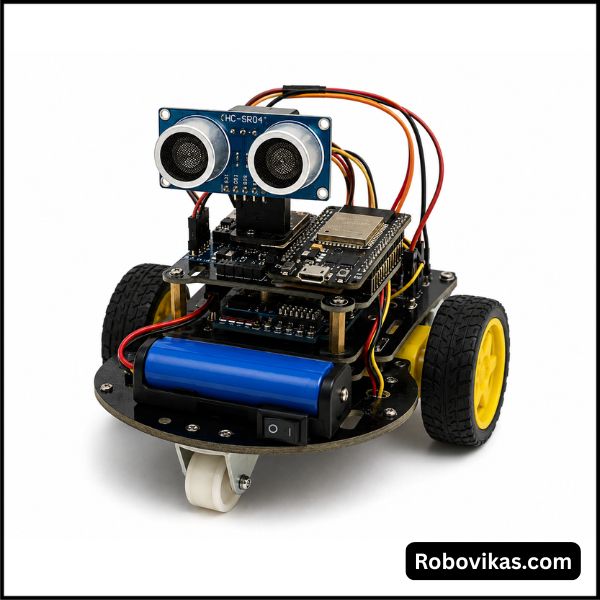
Step 2: Hardware Assembly
Chassis बनाओ
4 DC motors को chassis के corners पर लगाओ। Wheels लगाओ। Battery holder नीचे mount करो।
Motor Driver Connect करो.
| L298N Pin | Raspberry Pi GPIO |
|---|---|
| IN1 | GPIO 17 |
| IN2 | GPIO 18 |
| IN3 | GPIO 27 |
| IN4 | GPIO 22 |
| GND | GND |
| +5V | 5V |
Left motors → OUT1 & OUT2 से Right motors → OUT3 & OUT4 से
ज़रूरी बात: Battery directly Raspberry Pi पर मत लगाना। Pi का अलग 5V/3A adapter use करो। मैंने यह गलती एक बार की थी — Pi जलते जलते बचा था।
Ultrasonic Sensor Connect कैसे करे?
| HC-SR04 | Raspberry Pi |
|---|---|
| VCC | 5V |
| GND | GND |
| TRIG | GPIO 23 |
| ECHO | GPIO 24 |
USB Microphone और Speaker — simply plug in करो।
Step 3: Libraries Install करो
pip3 install RPi.GPIO SpeechRecognition pyttsx3
sudo apt install python3-pyaudio espeak -y
Error आए? घबराओ मत — Google पर paste करो, solution मिल जाएगा।
Step 4: Robot का Main Code
नई file बनाओ:
nano voice_robot.py
यह code paste करो:
import RPi.GPIO as GPIO
import speech_recognition as sr
import pyttsx3
import time

# Motor Pins
IN1, IN2, IN3, IN4 = 17, 18, 27, 22

GPIO.setmode(GPIO.BCM)
GPIO.setwarnings(False)
for pin in [IN1, IN2, IN3, IN4]:
    GPIO.setup(pin, GPIO.OUT)

# Text to Speech Setup
engine = pyttsx3.init()
engine.setProperty('rate', 150)
def speak(text):
    engine.say(text)
    engine.runAndWait()

# Motor Functions
def forward():
    GPIO.output(IN1, 1); GPIO.output(IN2, 0)
    GPIO.output(IN3, 1); GPIO.output(IN4, 0)

def backward():
    GPIO.output(IN1, 0); GPIO.output(IN2, 1)
    GPIO.output(IN3, 0); GPIO.output(IN4, 1)

def left():
    GPIO.output(IN1, 0); GPIO.output(IN2, 1)
    GPIO.output(IN3, 1); GPIO.output(IN4, 0)

def right():
    GPIO.output(IN1, 1); GPIO.output(IN2, 0)
    GPIO.output(IN3, 0); GPIO.output(IN4, 1)

def stop():
    for pin in [IN1, IN2, IN3, IN4]:
        GPIO.output(pin, 0)

# Voice Listen Function
recognizer = sr.Recognizer()
mic = sr.Microphone()

def listen():
    with mic as source:
        recognizer.adjust_for_ambient_noise(source, duration=0.5)
        try:
            audio = recognizer.listen(source, timeout=5)
            return recognizer.recognize_google(audio, language='en-IN').lower()
        except:
            return ""

# Command Handler
def process(cmd):
    if "forward" in cmd or "aage" in cmd:
        speak("Aage ja raha hun")
        forward(); time.sleep(2); stop()

    elif "backward" in cmd or "peeche" in cmd:
        speak("Peeche ja raha hun")
        backward(); time.sleep(2); stop()

    elif "left" in cmd or "baaye" in cmd:
        speak("Left turn")
        left(); time.sleep(1); stop()

    elif "right" in cmd or "daaye" in cmd:
        speak("Right turn")
        right(); time.sleep(1); stop()

    elif "stop" in cmd or "ruk" in cmd:
        speak("Ruk gaya")
        stop()

    elif "hello" in cmd:
        speak("Hello! Main tumhara AI Robot hun.")

    elif "naam" in cmd or "name" in cmd:
        speak("Mera naam Robo hai. Vikas ne banaya hai mujhe.")

# Start
speak("Main taiyar hun! Bolo kya karna hai.")
try:
    while True:
        cmd = listen()
        if cmd:
            process(cmd)
except KeyboardInterrupt:
    speak("Alvida!")
    GPIO.cleanup()
Run करो:
python3 voice_robot.py
“Forward” बोलो — robot चलेगा। यह moment याद रहेगा। 🤖
Step 5: Obstacle Avoidance (Bonus)
Robot को दीवार से बचाता है? यह function भी adds कर सकते है :
TRIG, ECHO = 23, 24
GPIO.setup(TRIG, GPIO.OUT)
GPIO.setup(ECHO, GPIO.IN)

def get_distance():
    GPIO.output(TRIG, True)
    time.sleep(0.00001)
    GPIO.output(TRIG, False)
    start = end = time.time()
    while GPIO.input(ECHO) == 0: start = time.time()
    while GPIO.input(ECHO) == 1: end = time.time()
    return round((end - start) * 17150, 2)

# Main loop mein use karo:
# if get_distance() < 20:
#     stop(); backward(); time.sleep(1); stop()
Common Problems और Solutions क्या है।
- Motors नहीं चलतीं Battery voltage check करो — L298N को minimum 7V चाहिए।
- Voice recognize नहीं हो रही Internet connection ज़रूरी है Google Speech API के लिए।
arecord -lसे microphone check करो। - Robot एक side जाता है दोनों sides के motors की speed थोड़ी अलग हो सकती है — PWM duty cycle से adjust करो।
- Raspberry Pi बहुत गर्म होता है 5V/3A proper adapter use करो। Heatsink लगाओ।
- Import error आती है वो library
pip3 installकरो जिसका error आया।
इसको Upgrade कैसे करें?
यह robot एक starting point है। आगे यह सब add कर सकते हो:
- Camera — Face recognition, object detection
- WiFi Control — Phone से control करो
- ChatGPT API — Real conversations possible
- Robotic Arm — Servo motors से चीज़ें उठाना
- Better Battery — LiPo battery से ज़्यादा runtime
एक एक step बढ़ते जाओ। Robot हर बार बेहतर होगा।
मेरा Personal Experience: AKTU Lucknow
भाई 3rd year में जब यह robot पहली बार बनाया था — wiring गलत हो गई थी और motor जलने की smell आई। घबराकर सब बंद किया, from scratch connections check किए। Speech recognition ठीक होने में पूरे 3 दिन लगे।
लेकिन जब finally robot ने पहली बार “Forward” सुनकर चला — उस रात hostel में सोया नहीं। सबको दिखाता रहा। Placement में जब companies ने पूछा “कोई project है?” — तो यही robot table पर रखा। किसी certificate ने उतना impression नहीं किया जितना इस robot ने।
यही सीख मिली — degree कम, skills ज़्यादा matter करती हैं.
FAQ: अक्सर पूछे जाने वाले सवाल
Q1. क्या बिना Coding knowledge के AI Robot बना सकते हैं? हाँ, बना सकते हैं। ऊपर दिया code copy-paste करना होगा। Python की basic समझ होनी चाहिए — variables, functions, loops। YouTube पर “Python for beginners Hindi” search करो, 1 हफ्ते में काफी है।
Q2. Raspberry Pi की जगह Arduino use कर सकते हैं? Arduino से basic movement और Bluetooth control होगा, लेकिन Voice AI और ChatGPT integration नहीं होगा। अगर सिर्फ movement चाहिए तो Arduino ठीक है, AI चाहिए तो Raspberry Pi ज़रूरी है।
Q3. AI Robot बनाने में कितना समय लगता है? अगर सब parts available हों तो 1-2 weekends में बन जाता है। पहली बार बनाओगे तो 3-4 दिन लग सकते हैं — यह normal है।
Q4. क्या यह Robot Hindi में बात कर सकता है? हाँ। recognizer.recognize_google(audio, language='hi-IN') set करो और pyttsx3 में Hindi voice install करो। Hindi commands जैसे “आगे जाओ”, “रुको” सब काम करेंगे।
Q5. Internet नहीं है तो Voice Recognition कैसे होगी? Google Speech API के लिए internet ज़रूरी है। Offline के लिए Vosk library use करो — यह offline voice recognition देती है। pip3 install vosk करो।
Q6. Battery कितनी देर चलेगी? 2 × 18650 battery से लगभग 1-2 घंटे। ज़्यादा runtime चाहिए तो 4 × 18650 या LiPo battery (2200mAh+) use करो।
Q7. क्या यह Robot घर की लाइट या fan control कर सकता है? हाँ! Relay module add करो और voice command से home appliances control होंगी। यह Home Automation का अगला step है।
Q8. Raspberry Pi 4 कहाँ से खरीदें? Amazon India, Robu.in, Thingbits.in — इन सब पर मिलता है। Robu.in पर अक्सर सस्ता मिलता है।
Conclusion:
| Total Budget | ₹8,000 – ₹10,000 |
| Time Needed | 1-2 Weekends |
| Difficulty | Beginner Friendly |
| Main Skill | Basic Python |
भाई पहली बार यह प्रोजेक्ट perfect नहीं बनेगा, मेरा भी नहीं बना था। Mistakes होंगी, और वही mistakes सबसे ज़्यादा सिखाएंगी। Comment में बताओ कि कहाँ अटके। और robot बन जाए तो photos ज़रूर share करना।
इसे भी पढ़ो:
- Arduino Robot Car Project — Bluetooth से Control करें
- Robotics Course India 2026 — Free Certificate से B.Tech तक
लेखक: विकास उर्फ अमल कुमार B.Tech Mechanical Engineering — AKTU Lucknow, Batch 2021–2025 Robotics, DIY Electronics aur AI Projects mein experience। India ke makers aur students ke liye practically tested guides likhta hun।
Pingback: Humanoid Robot Jobs 2026: भारत में टेस्ला, फिगर, यूनिट्री और NVIDIA की नई भर्तियां – सैलरी, स्किल्स और अप्लाई कैसे करें